


Silhouette Cameo discount code provided below.

For a very limited time, Silhouette is offering an amazing bundle at a big discount.
The discount gets you 1 CAMEO, 1 Silhouette scraper, 1 Silhouette hook, 1 Silhouette spatula, and 1 $25 download card for the Silhouette Online Store for $269.99
If you already have a CAMEO, this code can get you a bundle with 1 Silhouette scraper, 1 Silhouette hook, 1 Silhouette spatula, and 1 $25 download card for $29.99!
Offer valid through August 22, 2012.
**GO TO THIS LINK TO USE THE DISCOUNT**
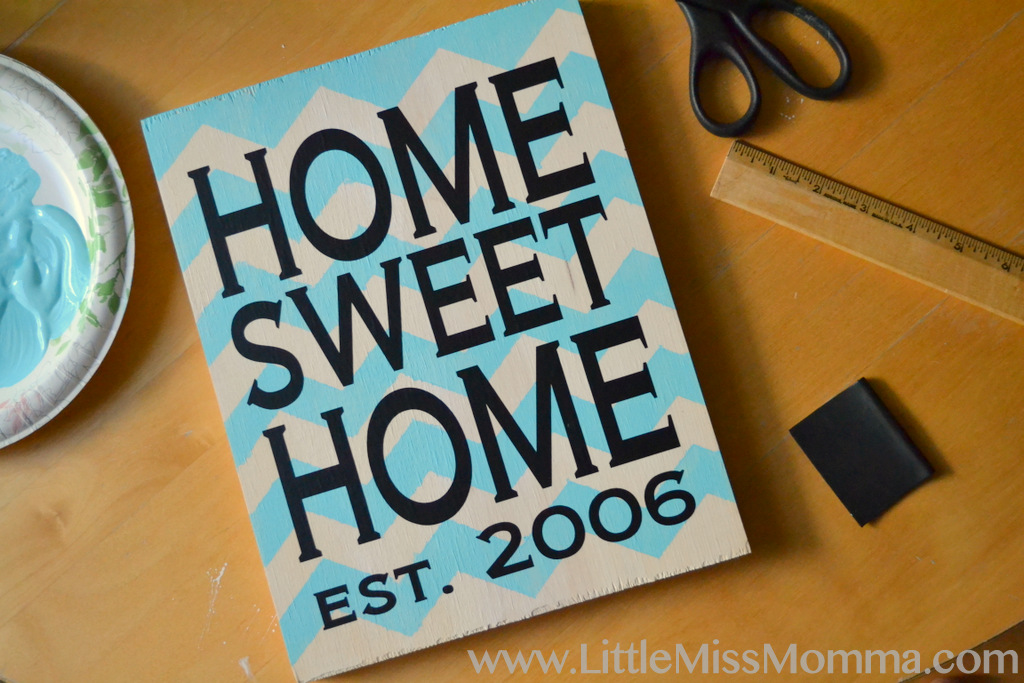
And now, on to the tutorial for this fun DIY Home Sweet Home front door sign.

Silhouette Premium Vinyl and transfer paper (12 inches wide)
9 x 12 wooden board
Acrylic paint in your colors of choice
Paint brush, scraper, ruler, scissors

(My craft room Owl came c/o I Sew Lucky)
Here are the paint colors I selected. I used to Martha Stewart chalkboard paint only because I liked the color and I already had it at home. However, I would suggest using a non-chalkboard paint for this project. First, I watered down the white acrylic paint and applied a single coat to the front and sides of the wooden board. I watered it down because I wanted to give it a white-wash look, and I wanted to still be able to see the grains in the wood.


While the white paint dried, I created my stencil and vinyl decal.

Using the software provided with your Silhouette, select your favorite font and design your sign. Be sure to be aware of how many inches your typography ends up being so that it fits on your board. I made my typography 8 x 10 so that it fit perfectly on the 9 x 12 board.

Using the Silhouette software again, create a second decal, this time using the chevron graphic that you can download for $0.99 in their store. I made the stencil larger than my board so that the graphic went over the edge. Once the stencil is cut, carefully peel it from the paper backing and line it up on your board. This was the trickiest part of the project for me because it was tough to get the lines straight. I went row by row and used a ruler to check that my chevrons were lining up.

Once you have the vinyl stencil in place, be sure to press it down firmly so there are no air bubbles or creases where paint can leak in.


Paint a very thin layer of the robins egg blue paint over the stencil. Again, I watered it down a tiny bit to give it a more beachy look. If you use too much paint over the stencil, it is more likely to run outside the lines and get goopy.
 Wait for the paint to dry and then carefully peel back the chevron stencil.

Next, follow the instructions on the vinyl packaging and apply the transfer paper to your vinyl decal.
Place the decal centered over your board and press down firmly. Smooth out all the bubbles, then peel away the transfer paper to reveal your brand new DIY Home Sweet Home sign.

I think these signs would make the perfect wedding or anniversary gift!
Pamela
What a great deal! I think I’m going to have to jump on that, I’ve been eyeing the cameo forever!
I love love love what you made. I love that shade of blue, and it looks like you bought it at the store! Would love to be able to make things like this for my home!
Thanks for sharing this, Ashley!<3
Melissa L
Nice job on the tute! I have made some similar gifts for newly weds… I think I want one for ME! 13 years later isn’t too late is it?? LOL
Have a fabulous and inspired day!
~I hope you can take a moment to pop over to http://www.mywatermelonmoon.com and checkout my (relatively new) blog! I a follower of yours and would love you to give some blog love as a follower of mine! Happy Crafting!
Michelle {the Momma Bird}
look at you being all crafty with a newborn AND toddler in the house
xoxo
Rhiannon
I love your sign {the blue color is gorgeous}. These would be a great wedding gift!
Rhiannon
Amanda @ The Little Giggler
LOVE this! Thanks for sharing!
Claire
What a great idea
Would be perfect to make name plaques in my girls room
Xox
Monkey
I want a sign for my house please. xo Mom
Jen
Love it!
Leilani S.
I LOVE IT!!! I will try it. Thank you!
Silhouette Portrait Giveaway - spotlight - Little Miss Momma
[…] HERE to my latest project made using my Silhouette machines. And click HERE to see my favorite Fall […]
Laura
I love this. I tried to make something similar using contact paper instead of vinyl on the Silhouette. Unfortunately, it bunched up. Have you ever tried contact paper, or is vinyl the only way I should do this?
Lisa
Love this!!! I’ve done a few projects like this, but most recently I had a problem with the vinyl. I tried to peel it up and it left a major mess of goo behind. I tried everything to get it off without ruining the painted wood, but in the end had to start over Has this ever happened to you? Any suggestions or tricks you’ve learned would help greatly!
Thanks!
Jennifer
I’m a new owner of a silhouette cameo, and I’m still figuring all of this out. Can you tell me exactly which chevron graphic from the online store you used to create this? Thank you!
Jessica Rau
Did you have trouble using the silhouette brand vinyl and transfer tape? I’ve been trying to make a wood sign and ran into these problems: the vinyl wouldn’t stick to my board very well and the transfer tape wouldn’t let go of the vinyl without a fight so i had to switch to contact paper. I’m on week two of troubleshooting how to make the vinyl work and am finally having to buy different brand vinyl. I really thought it should have been as easy as your tutorial looks like it went when I started.
Beginner Marathon Training Blog
Peel And Stick Silhouette Decal
[…] m also a member of affiliate programs. This means if you purchase an item from a […]
Techniques Blog
Jump Into Stencil Making With This
[…] link I provide to those shops, I sometimes receive a commission. I only share p […]
HERVE LEGER
“Women really dress based on their body shape. For example, Herve Leger Dresses I’m very athletic.