


Stencil Door Hanger Tutorial:
Love At Home
I went to Home Depot a few weeks back and searched through their scrap wood pile until I found these three beauties for a mere 25 cents a piece. I have been trying to figure out what to use them for and it finally came to me at two in the morning while I laid awake suffering from a serious case of jet lag.
So this afternoon I pulled out my new trusty alphabet stencils {you know how I love stencils} and got to work on this tutorial:

Here is what you will need:

3 wooden scraps all the same size {mine were 6 x 13}
Alphabet stencils {purchased at Michaels}
Stencil paint in the color of your choice
Acrylic paint in the color of your choice
Small paint brush for stencil paint
Large paint brush for wood
Wired ribbon of your choice {not pictured}
Staple gun {not pictured}
Pencil
Ruler
STEP ONE:
Paint the 3 wooden plaques in the color of your choice. I wanted to color to look a bit more textured {not to mention I didn’t have the exact color I wanted on hand}, so I mixed three colors to create the shade of turquoise I desired. I also watered down the paint with a quick splash of water so that the wood grains would still show through the paint:


Note the wood grain still visible through the paint.
Also, if your hands don’t look like this then you’re doing it wrong {lol}:

STEP TWO:
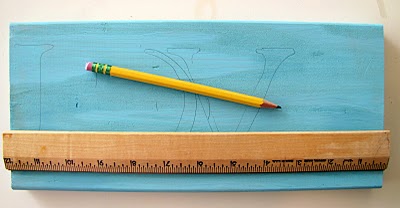
Prepare your wood pieces for the stencil. I used a pencil to lightly trace out my letters to be sure they spaced evenly across my wood plaques. Also, I drew a line across the bottom of each piece at 3/4 of an inch up so that my letters were even and not painted at an angle:

STEP THREE:
Apply a small amount of stencil paint to your small brush. Hold the stencil tightly in place and begin to paint {you can tape down the stencil if that is easier}. Remember, a tiny amount of stencil paint goes a loooonnnnggg way.

STEP FOUR:
Take a long strip of your ribbon and place it up the back side of your plaques about 1 inch from the edge. Staple the ribbon in place multiple times to ensure stability. Leave about 12 inches of additional ribbon for your bow at the top. Repeat this step on the other side of the plaques.

Flip over your plaques and secure bow at the top with your 2 pieces of ribbon {I ran out of ribbon, or else I probably would have made my bow a bit bigger}. Remember to use wired ribbon because it will be stronger than regular ribbon.

Now, take a step back and admire your creation.
P.S. Don’t look to closely, this certainly isn’t perfect–but that’s what makes it charming, right?!

Happy Crafting!
I am linking up to these totally awesome link partaaaaay’s!
Jax @ AlyandAsh
This is adorable! I am loving the turqoise and white!
Amanda
I love it, it's marvelous!!
PACountry
Great job! I may have to go play in our own scrap pile now!!!
Love Stitched
so cute! love the colors!
Cami
That is adorable. I'm always looking for unique things to put on my door.
Charity
Great job. The colour is fabulous!
Jessica
just found your blog with a link from blue cricket. love it! just wondering if you made the necklace pictured in your header? if so, do you have a tutorial? thanks!
Karie
Ooh! Very nice. I like it. I'll be linking.
Carolyn @ My Backyard Eden
So sweet! I love that you can still see the wood grain–it gives it an extra layer of cuteness!
Thanks for linking up to Make it Yours day!
Hope your weekend is great!
Ashley @ Little Miss Momma
Hi Jessica, I am glad you like the necklace in my header 🙂 I actually have an Etsy shop with a great friend of mine where we make and sell necklaces and headbands just like that one. The one in the pciture is called "Breakfast at Tiffany's"–here is the link: http://www.etsy.com/shop/lovestitched
Chocolate Sundaes
super cute!! I'd love for you to link this up to sundae scoop http://iheartnaptime.blogspot.com/2010/04/sundae-scoop-2-link-party.html
Jessica Hills
That is so pretty! I love that saying and I love that color! Thanks so much for linking to Favorite Things Friday!
BLJ Graves Studio
This is so cute! I love the color, very spring. 🙂
Kelley
I love HD wood bin! I did a similar project this week with some wood I found for FREE! I did not think of running them together like you did… great idea. And that color~!!! love it!
Classic Blog
On The Razer Door Hanger Razer Stencil
[…] ts and services that I would personally use and think are a good fit for my read […]
Mechanical Blog
Razer Door Hanger Razer Stencil
[…] purchase an item from a link I provide to those shops, I sometimes receive a com […]
HERVE LEGER
“You can see the techniques of the knit on this style; Bandage Dress one day we will videotape the process of how our pieces are made.